Windows LAPS with AzureAD/Intune Using PowerApps/PowerAutomate

This is all taken from Moe Kinani here: https://cloudbymoe.com/f/windows-laps—power-app, and I will be referencing the instructions there throughout. However, the instructions there are a little bare for my smooth brain and there were a few hurdles I needed to get over, either because I didn’t understand the documentation properly, or because there have been changes to the platform since this was posted. I’ll also editorialize here a bit as is my wont. Make sure to follow along over there, though.

Azure VM

We’ll need to set up an Azure VM. I won’t do into much detail here because there’s a lot of choices that go into making that that are your own. This VM is only going to be used to run some Microsoft Graph Powershell commands, so it doesn’t need to be beefy. I also know in my environment that this doesn’t need 100% uptime. I can still get to the LAPS passwords in Azure AD or Intune, so I chose basically the cheapest option of VM that also lets Microsoft shutdown my VM at any given time if they need the resources. That’s a tradeoff I’m good with. I also have the VM to shutdown every night at 6 PM, because I know I won’t have any need for it after that point using the built in tools for the VM. I also have it automatically turning back on 5 AM, which uses a different set of tools that I will detail later.

Once you’ve got a VM, get into the VM and run:

Set-ExecutionPolicy -ExecutionPolicy RemoteSigned -Scope AllUsers
Install-Module Microsoft.Graph -Scope AllUsers

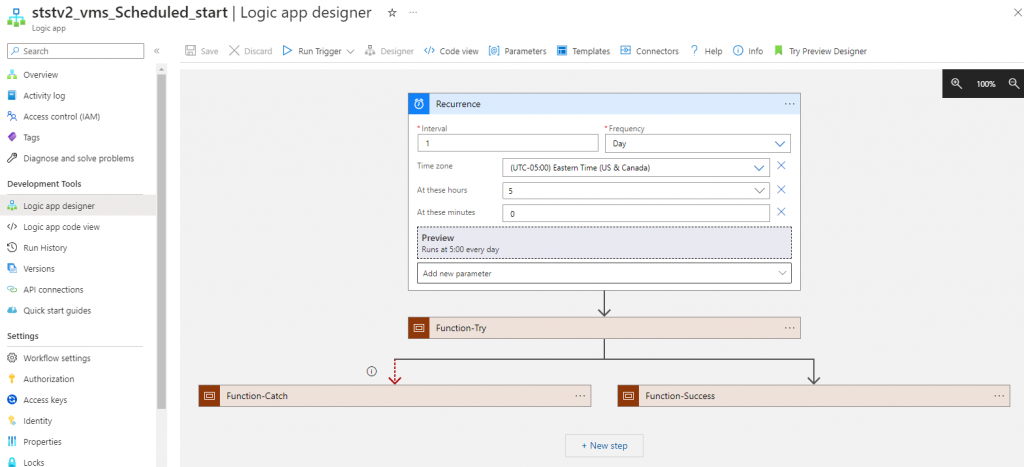
To set up VM auto-start and auto-stop, there are instructions here to set it up: Azure VM Start/Stop V2. The long and the short of it, though, is to go to their GitHub page linked in the above instructions and install it in your Azure instance. Then, in Azure, look for “Logic Apps.” In there, you’ll see some new stuff that looks like this.

Here are my settings.
Registered Apps

This part was very straightforward and you can follow Moe’s instructions on how to set up the two registered apps you’ll need. One will be used to get information on user accounts, and the other will be used to get the LAPS password for the machine.

Azure Automation Account

Again, Moe’s instructions are largely fine. However, there’s an issue with his scripts that you download from his GitHub.

In the test script, in line #19, you need to convert the string to a secure string before Connect-MGGraph will use it. Replace line #19 with the following:

$Token = $Connection.access_token | ConvertTo-SecureString -AsPlainText -Force$Token = $Connection.access_token

This also means that in his second script, you’ll need to replace line #25 with the above as well.

If you run either script, you’ll notice that when Connect-MgGraph -AccessToken $Token is run, you get a ton of stuff in your output.

All of this will mess with your PowerAutomate flow later. When Moe wrote his instructions, all that we received back was a simple “Welcome to Microsoft Graph” and so he has a compose step that gets rid of this as part of the flow. Since then, Microsoft has added more junk in here.Thankfully, we can edit line #28 and add -nowelcome to the end to get rid of all of this and the need for that compose transform.

The rest should work.

PowerAutomate

Go ahead and import WindowsLAPSStep1 from his GitHub. This can be done from the My Flows tab and choosing the Import dropdown and picking “Import Package (Legacy).” A note on this step. WindowsLAPSStep1 uses the legacy “PowerApps” app in its first step. You’ll see why this is an issue in the next step. At present it’s still working, but I imagine that at some point this will be deprecated, so keep this in mind if it’s not working.

This next step is where things start to really diverge from Moe’s instructions, and it’s entirely because the PowerApps app is in the process of being deprecated. You can’t pick it, only “PowerApps (V2),” which works differently but ultimately still gets the job done.

Start with PowerApps (V2) and add a Text input. In the first field, put in ThisItem.azureADDeviceId. Leave the rest of it default.
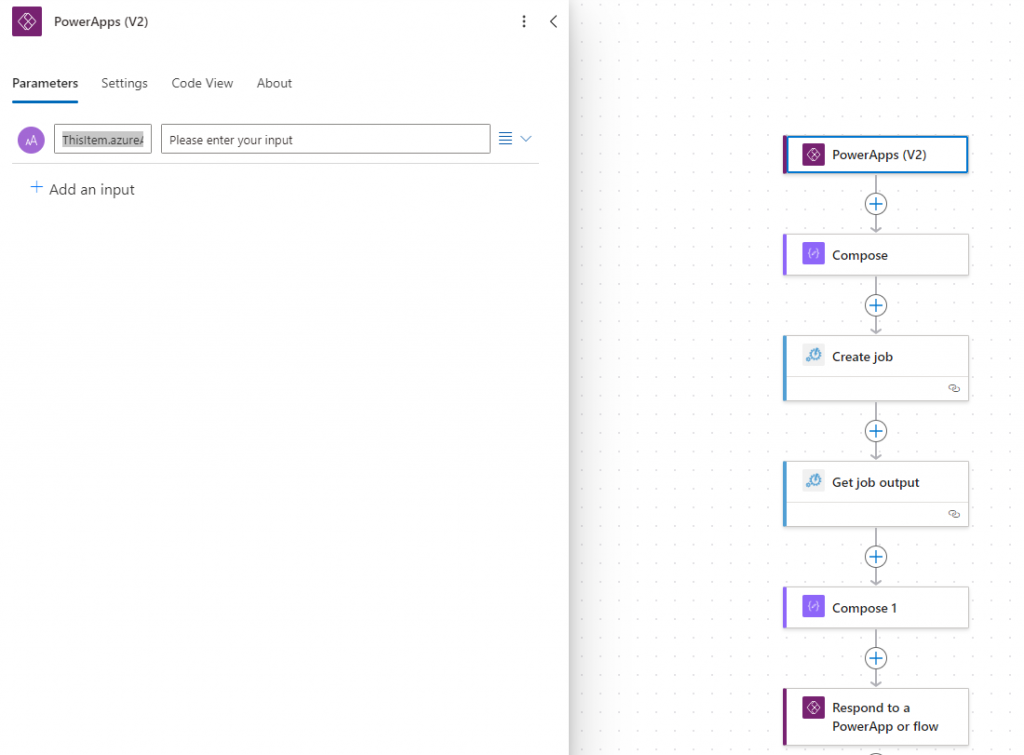
Next, add a Compose. Click the little lightning symbol, then choose ThisItem.azureADDeviceId. This brings that value into the flow in a way that we can use.

Next, add an Azure Automation Job

Here, you’ll specify details about the runbook you want the job to run. This is all the stuff we set up back in the “Azure Automation Account” step. The last field will use the output from the previous Compose step.

Next, we’ll create an Azure Automation Get Job Output action.

We’ll set that up to get the output of the job we created in the previous step.

Next, we’ll add another Compose action to parse the result back into a string.

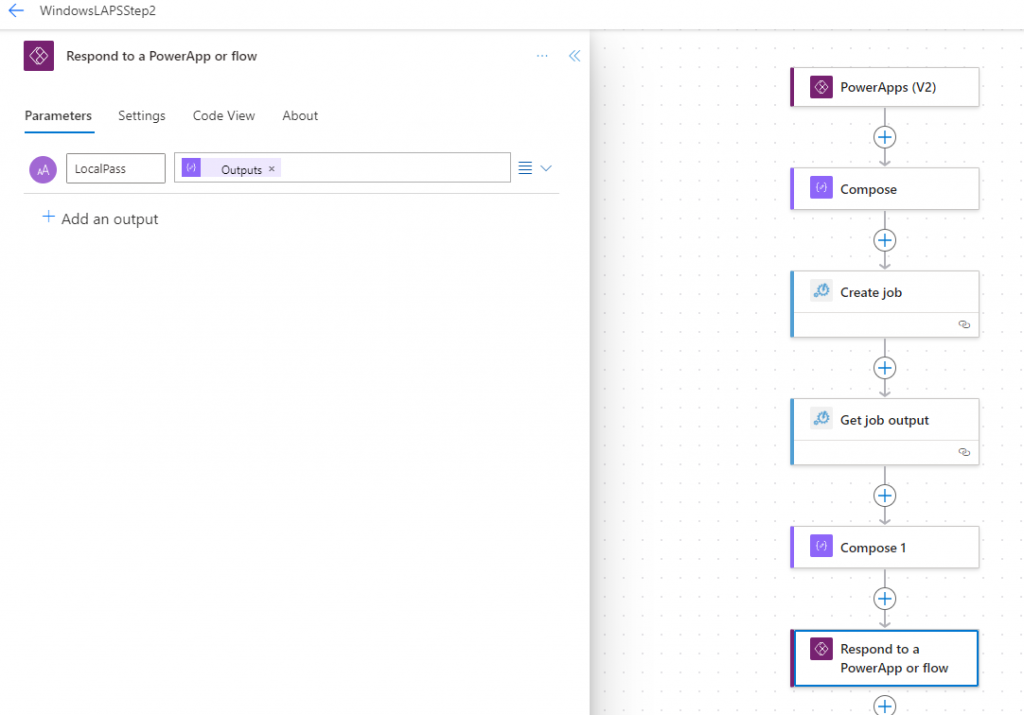
Finally, we’ll add a “Respond to a Powerapp or flow” action. We’ll add a text input named “LocalPass” with a value that is the output from the previous step’s compose string.
PowerApp

Once again, Moe’s got a nice little package for WindowsLAPSStep1 that can be downloaded from his GitHub and can be imported into PowerApp. Something that confused me was that, once you upload the Zip file, you’ll need to do some things the on the resulting page before you can click Import. You’ll need to click the spots marked with arrows and perform the required actions.
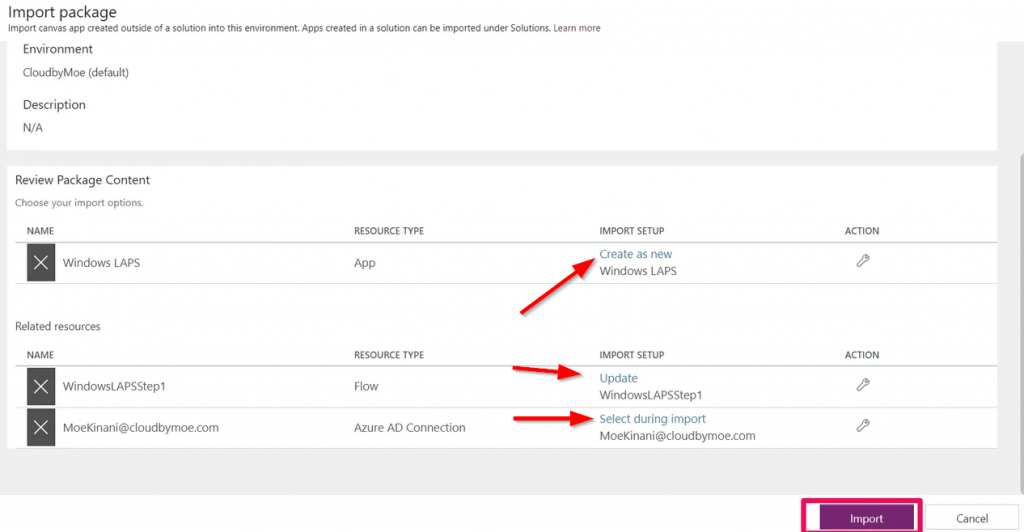
You can follow the rest of Moe’s instructions from here, but I made some significant tweaks to his imported app that I’ll detail below. But, at this point, if you finish out Moe’s instructions, you should have a working app that will pull Windows LAPS passwords for computers in AzureAD/Intune. I have it published and shared with specific users, and have it published to Microsoft Teams. Users are then able to go to the Apps section of Teams and install the app both on their desktop client and on their phone apps.

Licensing

You will need some kind of licensing for this app, since it uses Premium sources (Azure AD). At present, you either get licensing for each individual user that will be using this app. Or, you can get Per App licenses, which will then let any user this app is shared with use the app as long as there is an available license. In other words, you can either get named licenses (license per user) or a concurrent license (the Per App licenses). In my case, we so very rarely get passwords that it’s unlikely we’ll need to lookup passwords simultaneously enough as to need anything except a Per App license so the entire helpdesk staff can use the app.

PowerApps Customization

Spinning Load Icon

Probably as a result of using such a low power VM, my search takes a really long time when you click “Get LAPS.” On average it’s about a minute of waiting. Not a major problem for my use case, but sometimes you start to wonder if it’s really working. While there is a very very subtle little thing going on at the top of the screen, it’s way too subtle. So instead, I went to Loading.io and grabbed a loading spinner I liked that was free. I saved it as an SVG and uploaded it to the Media tab of the app. I then placed it on the screen, along with two text boxes, one that says the app is running, and another that says “No really, it’s running” after 10 seconds.
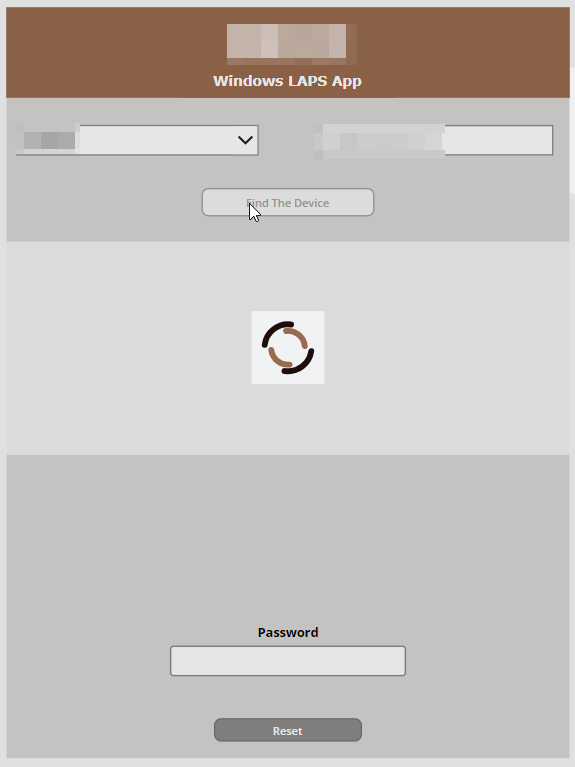
And while I’m at it, I also added a spinning wheel when clicking “Find the Device.” It’s a pretty inconsequential amount of time, but it provides continuity and trust in the app seeing the same elements when waiting.

Now, before I move on, I want to note that I changed the names of a bunch of the elements on the screen from the defaults that Moe used. This was to help me to understand what was doing what. I’m not going to change my stuff back, so just know that you might need to go searching for the elements I’m referencing. I hope I gave them fairly obvious names.

Add the spinner, and the two text boxes onto your screen and position them where you’d like them. The key here will be using the “Visible” property of elements in the advanced tab. In the spinner’s visible property, set it to locShowSpinner. Set the visible property on each of the two text boxes to ShowTimer1 and ShowTimer2 respectively, based on which will show first before the other. These elements should now disappear.

Now add a Timer. Set it somewhere on the screen, but set the visible property to false. This can be set to true just for troubleshooting. In the timer’s advanced tab, set the following:

OnTimerEnd:
UpdateContext({ShowTimer1: false});
UpdateContext({ShowTimer2: true});


Duration:
(Whatever you want in ms)

Now, on the “Find the Device” button element, in the advanced tab, put the following in the onSelect field:

// show the spinner
UpdateContext({locShowSpinner: true});
// Get Computer info
ClearCollect(MK6,WindowsLAPSStep1.Run(TextInput_FQDN.Text));
// hide the spinner
UpdateContext({locShowSpinner: false});

Then, on the “Get LAPS” button, put the following in the onSelect field:

// show the spinner
UpdateContext({locShowSpinner: true});
UpdateContext({ShowTimer1: true});
// start timer
UpdateContext({TimerGo: true});
// load data before going to next screen
Set(LABS_VAR,WindowsLAPSStep2.Run(ThisItem.azureADDeviceId).localpass);
// reset timer
UpdateContext({TimerGo:false});
Reset(Timer);
// hide the spinner
UpdateContext({locShowSpinner: false});
UpdateContext({ShowTimer1: false});
UpdateContext({ShowTimer2: false});

Finally, create a Text box that fills the entire screen is placed between all of these new elements and the rest of what Moe has. Name it something like “ClickShield” and in the visible field set it to locShowSpinner. This will prevent people from interacting with things while the app is searching.

Reset Button

Once you’ve searched for something, everything is left in the all of the fields where they were. This can make running another search confusing. So, I created a reset button at the bottom of the page.

Create a button, and in the onSelect field. put the following:

Set(LABS_VAR, "");
Clear(MK6);
Set(varReset, true);
Set(varReset, false);

Then edit the Reset property of the ComboBox dropdown with all your user’s names with varReset. Now when you click that button, everything should clear and reset back to the defaults.

Grey Out “Find The Device” when FQDN Field is Empty

During normal workflow, you should be finding a user in your drop down, and then when you select them that should fill in the field next to it with their FQDN, which is what the app uses to find assigned machines. But what if somehow that field gets blanked out? When you click “Find The Device” you’ll get an error about the upstream server not responding, since you gave it a null value. To make sure this doesn’t happen and to streamline the user experience a bit, we can “disable” the “Find The Device” button until there’s a value in there. Find the “DisplayMode” property of the “Find The Device” button and add the following:

If(IsBlank(TextInput_FQDN.Text),DisplayMode.Disabled,DisplayMode.Edit)
FortiGate Hairpin NAT

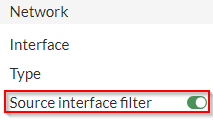
Remember how in the last post, I talked about the Source Interface Filter on FortiGate DNAT policies? And remember how I talked about how DNAT policies overrule static route policies? Well, if you ever find yourself with a guest network that needs to be able to talk to the DMZ, make sure to add the guest network to your Source Interface Filter. Then, when a system on the guest network tries to get to the IP of something in your DMZ that has an associated DNAT policy, this will route the traffic correctly. I guess this is basically a hairpin NAT?

FortiGate DNAT and Routing Table

If you have Destination NAT (DNAT) set up in your Fortigate, you may have noticed this button:

It took me a long while to figure out what this button means. We have two internet uplinks that, at time of writing this, are not aggregated in a redundant link or an SD-WAN link of any kind. We have two static routes set up, and if one ISP is down, we disable one of the routes and the one with lower priority becomes active. This is an unideal setup that I’ll be fixing in a future post, but for now it makes for an interesting situation that highlights something about how the DNAT works on the FortiGate.

I noticed recently that the systems that have a local IP that has been set up with DNAT were not able to communicate out to the internet. Traffic initiated from outside coming in could complete all of their necessary traffic, but I couldn’t browse out to the internet. In our case, these were Citrix controllers, so it took me a long time to notice because nobody was using those systems to browse the internet.

When I finally dug into what was going on, I realized just how important that little button up top is. Let’s say we have two static routes set up:

OrderDestination IPGateway
10.0.0.0/050.100.123.123
20.0.0.0/0200.100.123.123

We also have two DNATs set up:

OrderDetailsInterface
1200.100.123.124 –> 192.168.1.10Port 2
250.100.123.124 –> 192.168.1.10Port 1

In this case, when the system at 192.168.1.10 attempts to reach out to the internet, I would have expected the FortiGate to send that traffic along the static route set, in this case 50.100.123.123. Instead, however, the FortiGate checks the DNAT rules first, before the static routes, and matches the local IP with what’s on this table. It then sends it out of the assigned interface for that DNAT rule, using the public IP address set in the DNAT rule.

Obviously, this can create a lot of confusion because then, on the return trip. the FortiGate is getting a packet that doesn’t make sense and it doesn’t know how to route it back to the system, causing the system to be unable to communicate over TCP. So how to we fix this? Using that button. It’s fairly obvious in hindsight, but that button means that the DNAT rule only applies if the packet is being sent through the specified interface. By setting that filter to Port 2 in the first DNAT rule, I can be sure that traffic originating from 192.168.1.10, on my DMZ port (we’ll call it Port 3) will still follow the static route and the DNAT rule will only apply when the packet is coming from Port 2.

I hope this helps you figure out why, despite having static routes, firewall policies, and central NAT rules in place, nothing is working and your system can’t talk out to the internet. Maybe this was obvious, and maybe this is how it works on every other router, but this had me well and truly stumped for days.

Cheers!

FortiSwitch Port Configuration via FortiLink (Don’t Do It)

We recently switched from Cisco products to Fortinet products for our network stack. We decided, perhaps unfortunately, to hook the FortiSwitch up to the FortiGate via the FortiLink (I’m not even kidding with this terminology, their branding is legit), but this made it difficult to configure the ports on the FortiSwitch with any granularity.

If you’re reading this and are thinking about doing this, I’d recommend against it. You wind up having to go through the FortiLink to perform any configuration on the FortiSwitch, and some configuration elements are not exposed in the FortiGate GUI, requiring you to go through the CLI to configure them. You might think that you can still get to the web interface for the FortiLink via direct IP, so it’ll be okay, but once you create the link with the FortiGate, changes made through the FortiSwitch’s FortiGUI (sorry, this one’s a joke) will not take effect over configurations made via the FortiLink.

If you really want to to this, though, make sure you have a really straightforward setup and desperately want everything in one single pane of glass, and that you’re comfortable doing work in the CLI.

All of that being said, the below is how you’ll get to the FortiSwitch’s port configurations via the CLI from the FortiGate (over the FortiLink).

config switch-controller managed-switch
 edit [Switch SN]
  config ports
   edit [port#]

Connect-MGGraph “Invalid provider type specified”

If you’re setting up a certificate-based connection to Microsoft Graph Powershell (or whatever they’ve decided to name it at the point you’re reading this. You know what I’m talking about) and you’re getting an error when running:

$cert = Get-ChildItem Cert:\LocalMachine\My\$CertThumbnail
Connect-MgGraph -certificate $cert -ClientId $ClientID -TenantId $TenantID

don’t worry, that just means you need to run powershell as admin. You’re accessing the local machine’s cert store, so you need admin rights to do this.

Azure AD Synchronization Customization Cont.

In a previous post I talked about customizing the Azure AD synch rules to do some gymnastics with AD attributes getting imported into Azure AD. Recently I ran into a vendor who required that the email address’s capitalization match the capitalization in their SSO entries in order for the SSO to work. So if, on my side of things, I formatted people’s email addresses [email protected], but in the application I set someone’s email address to be [email protected], these two entries would not match and the SSO would not work.

I know. I’m flabbergasted as well.

To solve this, we resolved to always use lowercases for email addresses in both our AD and the application. But we’re human, people make mistakes, and more importantly people leave jobs with institutional knowledge like this and we may as try to make the computers do some of this work for us. As it turns out, the AD Sync synchronization rules editor has a function to convert strings to all uppercase or lowercase. We’ll use the previous post as a jumping off point.

Modified:
IIF(IsPresent([extensionAttribute1]),LCase([extensionAttribute1]), IIF(IsPresent([userPrincipalName]),[userPrincipalName], IIF(IsPresent([sAMAccountName]),([sAMAccountName]&"@"&%Domain.FQDN%),Error("AccountName is not present"))))

Wrapping [extensionAttribute1] with LCase() will force what’s in the user’s AD extensionAttribute1 attribute to be sent to Azure AD all lowercase. This makes sure that, at least from the IT side of things, we won’t have any problems if we accidentally set up [email protected]

Crontab – Run the first Tuesday for a full week

I recently had a cronjob that I wanted to run on the first full Tuesday of the month. Well, crontab doesn’t handle this, obviously, but it got me thinking how to figure this one out. As it so happens, the first Tuesday of the month will always fall somewhere between the 2nd and the 8th.

I’m defining the first full week of the month as the first week where, starting Monday, every day that week is of the same month.

So, the earliest full week is one where the 1st falls on a Monday, so the 2nd falls on a Tuesday.

Following that logic, the latest full week would be one where the month starts on a Tuesday, meaning the first full week starts with the 7th on a Monday. That means the first Tuesday of a full week would be on the 8th.

So if we make a cronjob that runs every Tuesday and checks if the date is >= 2 and <= 8, we should always find the first Tuesday of the month that is part of a full week.

OAuth2 Proxy Cont.

As is any SysAdmin’s wont in life, I’ve been messing around with OAuth2-Proxy and trying to add additional functionality beyond It-Finally-Works. If you haven’t already seen my previous post about setting up OAuth2-Proxy, please check it out since I’ll be working from that foundation.

Sign Out

While it might not have been the most important thing for a wiki page, it would be nice for my users to have the option to sign out if, say, they’re on a public computer (and responsible enough users to actually think of that, but that’s another story altogether).

This should be as simple as putting a “sign out” link for the users to click, but what URL do we use there. Well, there are two things we have to consider: the locally cached cookies, and the actual IDP session. If we do the first, but not the second, we’ll be taken to back to a login screen, but as soon as the IDP auth begins, your IDP will say “No need, you’re already logged in” and send you on your way without a username and password prompt. If you do the second, but not the first, then you won’t even get the sign in screen, because the cookies will still be cached. Even if you’re logged out from the IDP’s perspective, OAuth2-proxy still sees the cookies and will let you in without needing to check with your IDP.

OAuth2-Proxy’s documentation tell us we can use the following to clear cookies:

/oauth2/sign_out?rd=https%3A%2F%2Fmy-oidc-provider.example.com%2Fsign_out_page  

but then we need to also redirect to the IDP provider to also close sessions there. For Azure AD, that url is:

https://login.microsoftonline.com/common/oauth2/v2.0/logout? post_logout_redirect_uri=http%3A%2F%2Flocalhost%2Fmyapp%2F 

So we’ll need to combine these two into a URL. That monstrosity (including all of the HTML URL encoding necessary) should look something like this (assuming you’re using Azure AD as your IDP):

https://wiki.domain.com/oauth2/sign_out?rd=https%3A%2F%2Flogin.microsoftonline.com%2Fcommon%2Foauth2%2Fv2.0%2Flogout%3Fpost%5Flogout%5Fredirect%5Furi%3Dhttps%3A%2F%2Fwiki.domain.com

This URL will first tell OAuth2-Proxy to remove its cookies. then redirect (rd) to login.microsoft.com to log out of Azure AD, then tell Azure AD to re-route back to wiki.domain.com. From the user’s perspective, they’ll click on a sign out screen, choose a user account they’re logged in as to log out of, then get kicked to a couple of informational screens, then back to the sign in page.

There’s two more steps we need before we’re done. First, go into the Azure Portal, and go back to your registered app (Azure AD > App Registrations, and click your registered app). In the left-hand panel, go to “Authentication” and in the main panel, scroll down to “Front-channel logout URL.” Here, put in https://wiki.domain.com/oauth2/sign_out. I’m not entirely sure if this is correct, since in my testing I couldn’t quite get single sign-out to work right, but it couldn’t hurt.

Finally, and this is important, go into your config file and add whitelist_domains = "login.microsoft.com" (or whatever domain your IDP uses). Without this, OAuth2-Proxy won’t redirect to your IDP.

OAuth2-Proxy

Don’t want to hear me babble and just want to get to the meat? Click here to go straight to the instructions.

My company recently published a company wiki for end users to go to in order to find answers to common tech issues we’ve seen in our environment (wishful thinking, I know). And even more recently, we’ve found that we wanted to put up some more sensitive information that we wouldn’t want out on the public internet. To solve this, I wanted to force users to authenticate using their Azure AD SSO credentials before viewing the wiki.

Our wiki is published through a WordPress site, and considering how many plugins there are for WordPress, I figured it couldn’t be that difficult to find something I could use, right?

Wrong.

Turns out there are a few plug-ins that will allow admins to authenticate with SSO to administrate the site and publish, but nothing that would require visitors to authenticate before viewing the site. After a bunch of searching, I finally found my solution: OAuth2-Proxy.

Now for the catch: this does exactly what I wanted it to do, but the documentation is terrible, and I have an incredibly rudimentary knowledge of how Apache and reverse proxies work. Cue a few days of Just Trying Stuff ™ before finally finding the combination of things that worked.

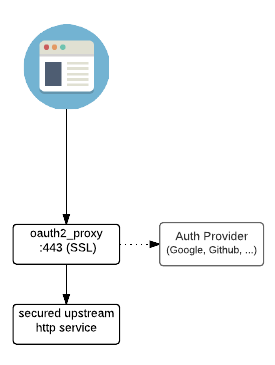
So here’s all I’m trying to accomplish. I want a user to go to my site (wiki.domain.com), receive an SSO prompt, log in, and then get to my site. Simple, right? Below is a little diagram that OAuth2-Proxy presents that shows what I’m trying to do.

In this case, I’ll be using OAuth2-Proxy as my reverse proxy. Thankfully it has this built-in so I don’t have to go through the headache of making this work with NGINX (something I only barely know how to configure to begin with).

First thing’s first, I need to get things set up in Azure AD, which will be my Auth Provider. Because this is using OAuth2 and not SAML, I can’t create an Enterprise Application in Azure. We’ll use App Registrations under Azure AD. Also, because this is Microsoft and they insist on changing their UI nearly constantly, this guide comes with the customary guarantee of 5 feet or 5 minutes, whichever comes first.

Azure AD

  • Go to Azure AD and, in the left panel, go to Manage > App Registrations
  • Click New Registration
  • Give the app a name, leave everything else default.
  • Click Register.
  • In the app, on the Overview page, note the Application (client) ID and the Directory (tenant) ID.
  • In the left panel, in Manage > Authentication, under “Redirect URIs,” add a new one for https://wiki.domain.com/oauth2/callback. Save.
  • In the left panel, in Manage > Certificates & secrets, under Client Secrets, create a new client secret. Note the Value (not the Secret ID). Also note the expiration on the secret. This will need to be renewed when the secret expires. Microsoft no longer allows secrets that do not expire.

Linux

I went with Ubuntu as the OS for my Oauth2-Proxy server. I will also note here that I’m primarly a Windows sys admin that has been allowed to dabble in Linux, so I might be doing stuff all funky like. Don’t @ me.

  • Create your working directory /home/username/oauth2proxy
  • Create a logs directory /home/username/oauth2proxy/logs
  • Create a www directory /home/username/oauth2proxy/www
  • Go to https://github.com/oauth2-proxy/oauth2-proxy and download the appropriate binary (wget URL/to/file)
  • Extract from the tarball (tar -xf filename).
  • Move oauth2-proxy to the root of the working directory (/home/username/oauth2proxy).
  • Run dd if=/dev/urandom bs=32 count=1 2>/dev/null | base64 | tr -d -- '\n' | tr -- '+/' '-_'; echo and note the result as your cookie secret.
  • Obtain TLS pem and key cert. Easiest to do this with certbot.
  • (Optional) Place a logo file as /home/username/oauth2proxy/www/logo.png
  • Create a config file (/home/username/oauth2proxy/config.cfg) with the following:
    provider = "azure"
    client_id = <enter client ID here from above>
    client_secret = <enter client secret value from above>
    oidc_issuer_url = "https://sts.windows.net/<enter tenant id here>/"
    cookie_secret = "<enter cookie secret here from above>"
    email_domains = "*"
    upstreams = "https://<IP address of site behind SSO>:<port>/"
    http_address = "127.0.0.1:80"
    https_address = ":443"
    request_logging = true
    standard_logging = true
    auth_logging = true
    logging_filename = "/home/username/oauth2proxy/logs/log.txt"
    ssl_upstream_insecure_skip_verify = "true"
    tls_cert_file = "/path/to/cert.pem"
    tls_key_file = "/path/to/privkey.pem"
    force_https = "true"
    custom_sign_in_logo= "/home/username/oauth2proxy/www/logo.png"
  • Create a Bash script (oauth2proxy.sh):
    #!/bin/bash /
    home/username/oauth2proxy/oauth2-proxy --config /home/username/oauth2proxy/config.cfg
  • Make the script executable (chmod 755 oauth2proxy.sh)
  • Copy the script to /etc/init.d
  • Create a symlink to run the script on startup (ln -s /etc/init.d/oauth2proxy.sh /etc/rc3.d/S02oauth2proxy.sh)
  • Reboot the server and confirm if the script is running

DNS and Networking

In DNS, make sure that wiki.domain.com is pointing to the public IP address of your OAuth2-Proxy server. You also want to make sure that the server running the wiki is only allowing http and/or https traffic from your OAuth2-Proxy server, otherwise people can do an end run around your proxy server and access the wiki directly via IP.

Stuff That Didn’t Work (And How To Fix It)

Here are some of the issues and roadblocks I ran into while I was implementing this, and how I went about solving them.

Browser gives a “Redirected too many times” error after SSO authentication
In the config file, make sure the syntax for the Upstreams parameter is exactly what I have. I had to make sure I included the port to forward traffic to (even if I’m forwarding http traffic to port 80) and had to make sure I ended the line with “/”.

Receiving a 403 Forbidden page after SSO authentication
In the config file, make sure to set the email domains to “*”. I originally had my email domain here, and maybe I need to figure out what the actual correct syntax here is, but I wound up giving it the “Domain Admins” treatment.

Can’t navigate to subpages on the upstream site
So I could go through SSO authentication and get to wiki.domain.com, but I could not then click on any links or get to wiki.domain.com/subpage. Turns out all the links on my site were pointing to http://wiki.domain.com/subpage instead of https://wiki.domain.com/subpage. Changing all of the links (I found a WordPress plugin that would do this for me in the WordPress database) to start with https://wiki.domain.com worked.

Delete Files Based On File Age

Ever wanted to delete every file over a certain age? Maybe for pesky log files that are ballooning the storage on your server?

The below script will delete all files in a specified folder that is older than the current date. Modify as necessary to change the age of files you want. Set up a Windows task to run as necessary.

$folder = "C:\Path\To\Folder"
$date = Get-Date -format "MM/dd/yyyy" | out-string
$files = Get-childitem -path $folder | where {$_.LastWriteTime -lt $date}
Remove-item $files.FullName