As is any SysAdmin’s wont in life, I’ve been messing around with OAuth2-Proxy and trying to add additional functionality beyond It-Finally-Works. If you haven’t already seen my previous post about setting up OAuth2-Proxy, please check it out since I’ll be working from that foundation.
Sign Out
While it might not have been the most important thing for a wiki page, it would be nice for my users to have the option to sign out if, say, they’re on a public computer (and responsible enough users to actually think of that, but that’s another story altogether).
This should be as simple as putting a “sign out” link for the users to click, but what URL do we use there. Well, there are two things we have to consider: the locally cached cookies, and the actual IDP session. If we do the first, but not the second, we’ll be taken to back to a login screen, but as soon as the IDP auth begins, your IDP will say “No need, you’re already logged in” and send you on your way without a username and password prompt. If you do the second, but not the first, then you won’t even get the sign in screen, because the cookies will still be cached. Even if you’re logged out from the IDP’s perspective, OAuth2-proxy still sees the cookies and will let you in without needing to check with your IDP.
OAuth2-Proxy’s documentation tell us we can use the following to clear cookies:
So we’ll need to combine these two into a URL. That monstrosity (including all of the HTML URL encoding necessary) should look something like this (assuming you’re using Azure AD as your IDP):
This URL will first tell OAuth2-Proxy to remove its cookies. then redirect (rd) to login.microsoft.com to log out of Azure AD, then tell Azure AD to re-route back to wiki.domain.com. From the user’s perspective, they’ll click on a sign out screen, choose a user account they’re logged in as to log out of, then get kicked to a couple of informational screens, then back to the sign in page.
There’s two more steps we need before we’re done. First, go into the Azure Portal, and go back to your registered app (Azure AD > App Registrations, and click your registered app). In the left-hand panel, go to “Authentication” and in the main panel, scroll down to “Front-channel logout URL.” Here, put in https://wiki.domain.com/oauth2/sign_out. I’m not entirely sure if this is correct, since in my testing I couldn’t quite get single sign-out to work right, but it couldn’t hurt.
Finally, and this is important, go into your config file and add whitelist_domains = "login.microsoft.com" (or whatever domain your IDP uses). Without this, OAuth2-Proxy won’t redirect to your IDP.
My company recently published a company wiki for end users to go to in order to find answers to common tech issues we’ve seen in our environment (wishful thinking, I know). And even more recently, we’ve found that we wanted to put up some more sensitive information that we wouldn’t want out on the public internet. To solve this, I wanted to force users to authenticate using their Azure AD SSO credentials before viewing the wiki.
Our wiki is published through a WordPress site, and considering how many plugins there are for WordPress, I figured it couldn’t be that difficult to find something I could use, right?
Wrong.
Turns out there are a few plug-ins that will allow admins to authenticate with SSO to administrate the site and publish, but nothing that would require visitors to authenticate before viewing the site. After a bunch of searching, I finally found my solution: OAuth2-Proxy.
Now for the catch: this does exactly what I wanted it to do, but the documentation is terrible, and I have an incredibly rudimentary knowledge of how Apache and reverse proxies work. Cue a few days of Just Trying Stuff ™ before finally finding the combination of things that worked.
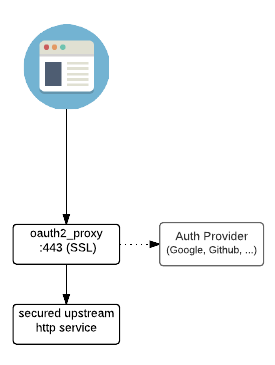
So here’s all I’m trying to accomplish. I want a user to go to my site (wiki.domain.com), receive an SSO prompt, log in, and then get to my site. Simple, right? Below is a little diagram that OAuth2-Proxy presents that shows what I’m trying to do.
In this case, I’ll be using OAuth2-Proxy as my reverse proxy. Thankfully it has this built-in so I don’t have to go through the headache of making this work with NGINX (something I only barely know how to configure to begin with).
First thing’s first, I need to get things set up in Azure AD, which will be my Auth Provider. Because this is using OAuth2 and not SAML, I can’t create an Enterprise Application in Azure. We’ll use App Registrations under Azure AD. Also, because this is Microsoft and they insist on changing their UI nearly constantly, this guide comes with the customary guarantee of 5 feet or 5 minutes, whichever comes first.
Azure AD
Go to Azure AD and, in the left panel, go to Manage > App Registrations
Click New Registration
Give the app a name, leave everything else default.
Click Register.
In the app, on the Overview page, note the Application (client) ID and the Directory (tenant) ID.
In the left panel, in Manage > Certificates & secrets, under Client Secrets, create a new client secret. Note the Value (not the Secret ID). Also note the expiration on the secret. This will need to be renewed when the secret expires. Microsoft no longer allows secrets that do not expire.
Linux
I went with Ubuntu as the OS for my Oauth2-Proxy server. I will also note here that I’m primarly a Windows sys admin that has been allowed to dabble in Linux, so I might be doing stuff all funky like. Don’t @ me.
Create your working directory /home/username/oauth2proxy
Create a logs directory /home/username/oauth2proxy/logs
Create a www directory /home/username/oauth2proxy/www
Move oauth2-proxy to the root of the working directory (/home/username/oauth2proxy).
Run dd if=/dev/urandom bs=32 count=1 2>/dev/null | base64 | tr -d -- '\n' | tr -- '+/' '-_'; echo and note the result as your cookie secret.
Obtain TLS pem and key cert. Easiest to do this with certbot.
(Optional) Place a logo file as /home/username/oauth2proxy/www/logo.png
Create a config file (/home/username/oauth2proxy/config.cfg) with the following: provider = "azure" client_id = <enter client ID here from above> client_secret = <enter client secret value from above> oidc_issuer_url = "https://sts.windows.net/<enter tenant id here>/" cookie_secret = "<enter cookie secret here from above>" email_domains = "*" upstreams = "https://<IP address of site behind SSO>:<port>/" http_address = "127.0.0.1:80" https_address = ":443" request_logging = true standard_logging = true auth_logging = true logging_filename = "/home/username/oauth2proxy/logs/log.txt" ssl_upstream_insecure_skip_verify = "true" tls_cert_file = "/path/to/cert.pem" tls_key_file = "/path/to/privkey.pem" force_https = "true" custom_sign_in_logo= "/home/username/oauth2proxy/www/logo.png"
Create a Bash script (oauth2proxy.sh): #!/bin/bash / home/username/oauth2proxy/oauth2-proxy --config/home/username/oauth2proxy/config.cfg
Make the script executable (chmod 755 oauth2proxy.sh)
Copy the script to /etc/init.d
Create a symlink to run the script on startup (ln -s /etc/init.d/oauth2proxy.sh /etc/rc3.d/S02oauth2proxy.sh)
Reboot the server and confirm if the script is running
DNS and Networking
In DNS, make sure that wiki.domain.com is pointing to the public IP address of your OAuth2-Proxy server. You also want to make sure that the server running the wiki is only allowing http and/or https traffic from your OAuth2-Proxy server, otherwise people can do an end run around your proxy server and access the wiki directly via IP.
Stuff That Didn’t Work (And How To Fix It)
Here are some of the issues and roadblocks I ran into while I was implementing this, and how I went about solving them.
Browser gives a “Redirected too many times” error after SSO authentication In the config file, make sure the syntax for the Upstreams parameter is exactly what I have. I had to make sure I included the port to forward traffic to (even if I’m forwarding http traffic to port 80) and had to make sure I ended the line with “/”.
Receiving a 403 Forbidden page after SSO authentication In the config file, make sure to set the email domains to “*”. I originally had my email domain here, and maybe I need to figure out what the actual correct syntax here is, but I wound up giving it the “Domain Admins” treatment.
Can’t navigate to subpages on the upstream site So I could go through SSO authentication and get to wiki.domain.com, but I could not then click on any links or get to wiki.domain.com/subpage. Turns out all the links on my site were pointing to http://wiki.domain.com/subpage instead of https://wiki.domain.com/subpage. Changing all of the links (I found a WordPress plugin that would do this for me in the WordPress database) to start with https://wiki.domain.com worked.