
Remember how in the last post, I talked about the Source Interface Filter on FortiGate DNAT policies? And remember how I talked about how DNAT policies overrule static route policies? Well, if you ever find yourself with a guest network that needs to be able to talk to the DMZ, make sure to add the guest network to your Source Interface Filter. Then, when a system on the guest network tries to get to the IP of something in your DMZ that has an associated DNAT policy, this will route the traffic correctly. I guess this is basically a hairpin NAT?
FortiGate DNAT and Routing Table
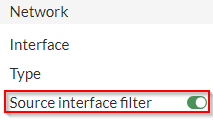
If you have Destination NAT (DNAT) set up in your Fortigate, you may have noticed this button:
It took me a long while to figure out what this button means. We have two internet uplinks that, at time of writing this, are not aggregated in a redundant link or an SD-WAN link of any kind. We have two static routes set up, and if one ISP is down, we disable one of the routes and the one with lower priority becomes active. This is an unideal setup that I’ll be fixing in a future post, but for now it makes for an interesting situation that highlights something about how the DNAT works on the FortiGate.
I noticed recently that the systems that have a local IP that has been set up with DNAT were not able to communicate out to the internet. Traffic initiated from outside coming in could complete all of their necessary traffic, but I couldn’t browse out to the internet. In our case, these were Citrix controllers, so it took me a long time to notice because nobody was using those systems to browse the internet.
When I finally dug into what was going on, I realized just how important that little button up top is. Let’s say we have two static routes set up:
| Order | Destination IP | Gateway |
| 1 | 0.0.0.0/0 | 50.100.123.123 |
| 2 | 0.0.0.0/0 | 200.100.123.123 |
We also have two DNATs set up:
| Order | Details | Interface |
| 1 | 200.100.123.124 –> 192.168.1.10 | Port 2 |
| 2 | 50.100.123.124 –> 192.168.1.10 | Port 1 |
In this case, when the system at 192.168.1.10 attempts to reach out to the internet, I would have expected the FortiGate to send that traffic along the static route set, in this case 50.100.123.123. Instead, however, the FortiGate checks the DNAT rules first, before the static routes, and matches the local IP with what’s on this table. It then sends it out of the assigned interface for that DNAT rule, using the public IP address set in the DNAT rule.
Obviously, this can create a lot of confusion because then, on the return trip. the FortiGate is getting a packet that doesn’t make sense and it doesn’t know how to route it back to the system, causing the system to be unable to communicate over TCP. So how to we fix this? Using that button. It’s fairly obvious in hindsight, but that button means that the DNAT rule only applies if the packet is being sent through the specified interface. By setting that filter to Port 2 in the first DNAT rule, I can be sure that traffic originating from 192.168.1.10, on my DMZ port (we’ll call it Port 3) will still follow the static route and the DNAT rule will only apply when the packet is coming from Port 2.
I hope this helps you figure out why, despite having static routes, firewall policies, and central NAT rules in place, nothing is working and your system can’t talk out to the internet. Maybe this was obvious, and maybe this is how it works on every other router, but this had me well and truly stumped for days.
Cheers!
FortiSwitch Port Configuration via FortiLink (Don’t Do It)
We recently switched from Cisco products to Fortinet products for our network stack. We decided, perhaps unfortunately, to hook the FortiSwitch up to the FortiGate via the FortiLink (I’m not even kidding with this terminology, their branding is legit), but this made it difficult to configure the ports on the FortiSwitch with any granularity.
If you’re reading this and are thinking about doing this, I’d recommend against it. You wind up having to go through the FortiLink to perform any configuration on the FortiSwitch, and some configuration elements are not exposed in the FortiGate GUI, requiring you to go through the CLI to configure them. You might think that you can still get to the web interface for the FortiLink via direct IP, so it’ll be okay, but once you create the link with the FortiGate, changes made through the FortiSwitch’s FortiGUI (sorry, this one’s a joke) will not take effect over configurations made via the FortiLink.
If you really want to to this, though, make sure you have a really straightforward setup and desperately want everything in one single pane of glass, and that you’re comfortable doing work in the CLI.
All of that being said, the below is how you’ll get to the FortiSwitch’s port configurations via the CLI from the FortiGate (over the FortiLink).
config switch-controller managed-switch
 edit [Switch SN]
  config ports
   edit [port#]